
In this How to Take Screenshot in Windows 10 article, we are going to capture our screen using the keyboards and the snipping tool.
Screenshots are an integral part of using computers, and users may need them for multiple reasons. For instance, one may require them to capture certain graphics or send an error report to IT. They are equally important for saving images for a presentation or a specific still of a video. Thus, there is an endless range of purposes of screenshots. This article will cover various ways of capturing screenshots in Windows 10. From using keyboard shortcuts to on-screen commands, read on to find more about how to take screenshot Windows 10 style.
Taking Screenshot in Windows 10 with Keyboard Shortcuts
The quickest and most common way of taking a screenshot in Windows 10 is by using the famous Print Screen button on the keyboard with which almost everyone is familiar. You can find this Print Screen button with the name PrtScrn or PrSc on your keyboard. However, pressing the Print Screen key will not do anything on its own and may confuse you as nothing happens when you push it. It is because the keyboard commands work in unison with other keys.
When you press the PrtScrn button, instead of capturing the image and displaying it, it copies all the screen contents to the clipboard. Hence, it is just like using Ctrl+C in Word. Then you need to paste the contents. To develop the contents into an image, you need to open Paint and press Ctrl+V. Then, save the File using either Ctrl+S or by going through the File option. Name your image and decide the location, and voila!
Automatic Saving Method
If you wish to skip the copy and paste hassle, there is a solution for you. When you press Windows key + Print Screen, it will capture the complete screen and automatically save it as an image. At this point, your screen will get dimmer for a split second. It is a visual confirmation to indicate the capturing of the screen. This option is perfect for those who have to take screenshots a lot and do not have time to waste with the copy/paste routine.
So, by using this shortcut, you can take as many screenshots as you want. However, where is your computer system saving all these screenshots? To find them, navigate through the Pictures folder and look out for the Screenshots subfolder. If you have a Microsoft OneDrive account, make sure to check the OneDrive Pictures folder for Screenshots, too, as your computer can save them there also by default instead of saving in the local storage.
Capturing Active Window
If you need to capture only the active window, press the Alt and Print Screen keys together. While using this, you will not receive any visual confirmation of your screenshot capture; however, you can paste the image into any other program.
Capturing Small Portion of the Screen
Sometimes, you may only need a tiny portion of the screen, but you might have to go through the hassle of snapping the entire screen and then crop the image. Well, we are here to tell you there is no need for that!
So, for capturing a small area of the screen, press Windows Key + Shift + S. Once you press these keys, a small toolbar appears at the top of your screen, showing different cropping options.
It can be an excellent keyboard shortcut for taking screenshots, and it is the only option that displays a thumbnail at the bottom right of the screen indicating that you have captured an image. When you click on the thumbnail, it opens the picture.
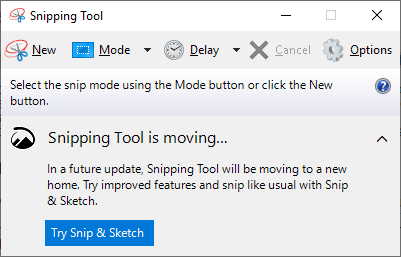
Taking a Screenshot on Windows 10 with Snipping Tool
Microsoft incorporates a very flexible screenshot utility tool called Snipping Tool in Windows 10. You can use this tool anytime to take a screenshot and save it as an image file. This entire process is free from any copy/pasting process and executes in no time.
You can commence the Snipping Tool from the Start menu. In the “Mode” drop-down, pick what kind of screenshot shape you need — choices ranging from full screen to rectangle. And then you have a free form where you can make whatever shape you want.
Clicking New will freeze your screen. However, do not let that worry you because the app is at work. You can use the mouse to create the screenshot shape. The screenshot will then show in the Snipping Tool window.
If you wish to incorporate anything like a tooltip, you may choose from the options displayed right after the mouse movement. You can also specify the wait duration before taking the screenshot by using the Delay menu. If you prefer, after taking the screenshot, you can utilize the drawing tools for annotating your screenshot.
Once you finish, click File and then choose Save As to save your finalized screenshot to your computer. Moreover, you can click the copy button in the Snipping Tool window (it appears as two pages laid over each other) for copying the image on your clipboard.
Taking a Screenshot on Windows 10 with the Game Bar
If you’re in the middle of your game and want to capture your game screen without the hassle of exiting and opting for screenshots options, then Game Bar is your savior! Game Bar is an overlay with which gaming enthusiasts can capture screenshots or record videos. Here is a quick guide on how to do it:
Start your game from the Start menu or the Xbox Console Companion program. While you play the game, press the Windows key + G, the Game Bar overlay will appear on the screen. Click the icon to capture your screen. It will automatically save to the Videos folder in a subfolder titled Captures.
Final Words
There you have it! These are all the ways Windows 10 offers for capturing screenshots. Some of the options require a little work while others are straightforward, but it is up to you which method you choose. We hope this guide helps you feel confused about taking a screenshot on Windows 10.